11/19/2014 19:00:14
●
Producer's Tools: Create New File Version
Here’s a little insight into the way I work. My readers know that I’m producing videos for a living. The thing is, I’m the nerdy kind of a video producer. I know my way around Xcode, I know AppleScript, Ruby, a little Python. I know what version control is, and I can see the advantages of testing and continuous integration1.
So considering all this, it’s probably no surprise that I version number my edits. Basically every day in the morning I create a new version (file in the Finder, or project in Final Cut Pro X). Renders have this version number in their name. For clients this has the advantage that they can refer to a fixed number to ask for edit improvements. For me this has the advantage that the exported version number has the same “meaning” for both of us. So when client is happy with version 25, while we’re already at version 30, it is very easy to go back to that version.
Long story short. Normally I work in Motion, Sketch, Affinity Designer, Final Cut, Keynote, whatever does, what I need to accomplish. Typically I number the files by hand; with an added v$versionNumber at the end. Example:
MindNode for iOS App Preview v14
In the past I’ve been doing this by hand. But why do it by hand, when a Keyboard Maestro can help?
Here’s a short demo:
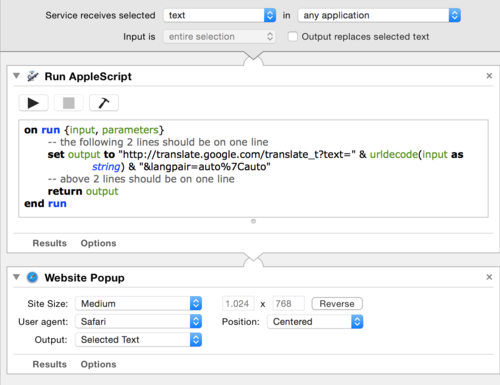
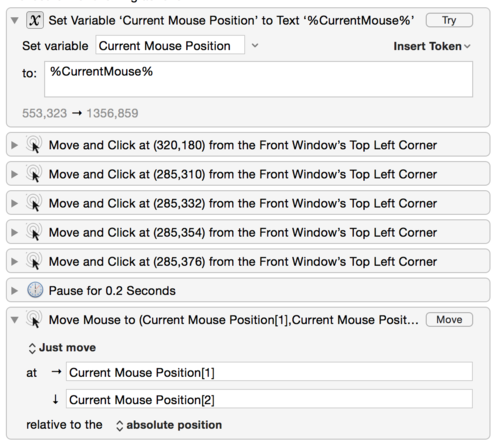
What this macro does, essentially, it uses the Duplicate command to create a new file (actually the same thing that I would do by hand), and then use some regular expression replacing and variable trickery to assemble the new file name.
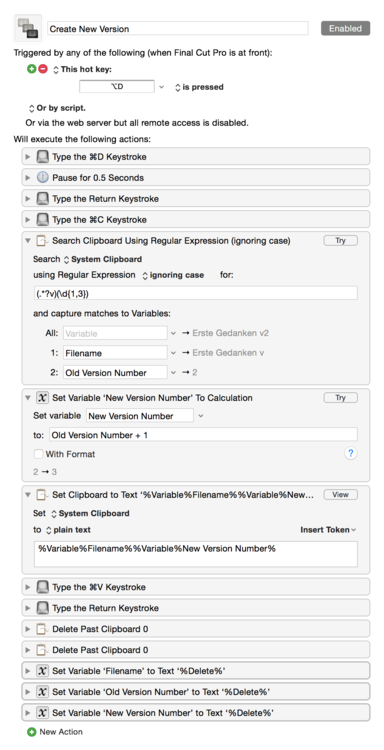
In the Finder a new file always gets an additional “copy" at the end, which I don’t need. In Final Cut new items get an additional "1”.2 I find the number by itself not telling enough, a space between v and the number itself unpleasant looking, and a written out version too long.
Download is here.
11/16/2014 19:00:23
●
30 Day Challenge: No Notifications
I read the article, Zero Notifications, some weeks ago, in which Joel describes a setup where he disallows any app to send him notifications.
The method seems extreme, to some, but what he’s after is bringing attention to things that are important. If you look at your Notification Center, most of the things that are in there are just stupid, and/or plain unnecessary. For example on OS X nearly every app sends a notification of something they started or finished. Unlike on iOS, the user isn’t asked for allowance however. The default is: “allowed”. The result is that many folks rarely look at notifications. In fact when I open(ed) my Notification Center it was always full with stuff of things I didn’t even knew I had anymore.
This post started its existence about one month ago. I was eager to try this myself. These are some of my thoughts and realizations I had back then, until now. If you are a regular reader, you know that I’m not keen on useless distractions. In fact I want to keep them as minimal as possible. Zero Notifications, however, is, even for me, a different league. Zero Notifications means exactly 0 notifications. It means setting each and every app to not show up in the Notification Center, no banners, no badges, no sounds, nothing.
The goal here is to find things that are important. When an upload of an app finishes, that’s kind of nice, but it would happen no matter whether I’m informed or not. There are things that are really really important, like, when the phone rings, for example. I can confirm that some people were not so amused when I turned off my phone ringing. But I did it nonetheless. Just to experience how it is, to be really really notification free.
This is one of my more recent 30 Day Challenges: The No Notifications Setup.
No Notifications: The Setup Phase
Maybe to start I should mention that I personally don’t allow new apps to send me notifications. A game that wants to send notifications: “don’t allow”, an app: “don’t allow”. Usually only those apps that I actually want to be notified from would be allowed, but that changed. To start off I decided to not use certain apps anymore. Slack is what we use at IdeasOnCanvas, and at Der Übercast. Trello is an app both companies use too. I have removed both from my iPhone, iPad, and Mac. The thing is, when I do work for the two firms, then that is a big enough task to make it worth to open the Trello and Slack websites. I don’t need to be notified at 10pm at night, when someone writes :poop: or posts an animated GIF.
So at the beginning I removed every app that I don’t need anymore. I was pretty radical this time around, but honestly it felt really good to have all the stuff gone. I approached it like a “new device install” → if I really would be needing it, then I’d remember it and install. I never had so much space on iPhone. 16GB phone and I think 3 or 4 GB of free space.
After the apps were gone, it was much easier to go into the notification settings for each app and turn off:
- Allowed to send notifications: off
- Show in Notification Center: no
- Sounds: off
- Badge: off
- Show on Lock Screen: off
- Alert style when unlocked: none
I did this for every app. As I mentioned, even the phone. I have since re-enabled some notifications for apps. The phone is once again allowed to ring. OmniFocus is allowed to make a ding and it is allowed to have a badge. Mail can have a badge, but isn’t allowed on the Lock Screen. Messages is allowed to show up on the Lock Screen, and it can have a badge. Price notifiers like PriceRadar, and AppZapp are allowed on Lock Screen, but aren’t allowed in the Notification Center. Several other apps are, once again, allowed now too. 19 of my 111 apps are allowed to show notifications, 8 of which are allowed in the Notification Center. Basically: badges, sounds, and banners, are on for all.
All that written: Pleeease, Apple, the notification options on iOS are horrible to setup!
That was iOS. OS X is a different beast. Notifications are even less useful on OS X than on iOS. I wrote a Keyboard Maestro macro to turn off all notifications.
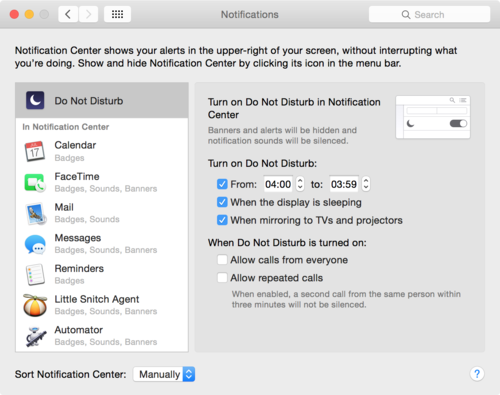
The downside is that Yosemite has a bug where, after a reboot, all notification settings are restored to the default. So that’s not helpful at all. I decided for the most drastic step in my 30DC: use Do Not Disturb to my advantage. Do Not Disturb is on from 4:00am to 3:59am. In that one-minute frame, where I’m usually asleep, all notifications are shown. Honestly, I don’t miss anything.
Here’s how it feels, for someone else, to live without notifications:
For the first week that I turned off notifications, I checked Twitter, Facebook, Email and other places regularly. In fact, I still do, although maybe not so much as that first week. After a couple of weeks, I came to love the fact that nothing came onto my lock screen or lit up my phone. I even found that I frequently started to use the switch in Mac OS X to turn off desktop notifications until the next day.
It is true. The first couple of days or so, it’s a bit “unusual”, but once you get used to a non-flashing phone, it becomes normal. When the phone then flashes or makes a tone, that tone has much more presence. “Oh, it made a ding!” A “ding” means it’s important. A message from your significant other, a client calling, etc.
I think what causes the first “unusual” feeling is a little bit FOMO (Fear of missing out). “I don’t get all tweets anymore. What’s wrong? Do people not tweet anymore? What are they tweeting about?” That thought makes you want to turn on notifications again, but I recommend you fight the urge. Stick with it for a day or two, and it will go away.
No Notifications: The Result
I would not go back anymore. I’m relatively happy with my setup on iOS. It dings often enough, but not too much. OS X: thanks for having notifications for such a long time, but I probably won’t turn Do Not Disturb off anytime soon.1
How Am I Reachable?
I want to add that I also reconsidered how I’m reachable for other people. Let me explain. I work as motion graphics designer, screencaster, “film guy”. Typically when I get a job, I get to use whatever my client uses. I work in their “environment”. If they use Slack, I download Slack and use it. If they use ICQ, I use ICQ. If they use Skype, I use Skype. You get the drill. Whatever “system” they came up with, I use, for the time of the project. Over the last 10 years or so, I’ve accumulated quite a lot of accounts for various networks. Skype, AIM, Facebook, ICQ, MSN, Jabber, IRC, Yahoo!. Apps like IM+ make it easy to be connected and available on multiple networks at the same time. Of course, from a 2014 perspective, it doesn’t make sense to be on IRC anymore, nor Yahoo!, ICQ, or MSN, but I still have multiple networks configured. Right now the most important ones are Jabber, Facebook, Threema, and, believe it or not, AIM.
While it’s nice to be available all time, those networks are not really relevant to me, or my life. When the doors close at zCasting, then Slack is off. I don’t enjoy Facebook, but I have to use it because it became my number 1 business network. While I like that clients can reach me through AIM all the time, I don’t really like that they send me stuff at night, and expect an answer, just because some app is keeping me online.
Really tough decision that I long thought about, because on the one hand I want to be available for my customers, but on the other hand I have a private life, that just so happens to correlate sometimes with AIM, Skype, whathaveyou. I want time off the work, to relax, inspire myself, and regenerate.
Long story short. At the beginning of a project I now ask clients what communication system they use. I set it up, but in our contract is now a clause that makes it clear when and, most importantly, how they can reach me. This worked well for the last two projects.
Conclusion
After the 30 days I’m pretty happy with the changes. If you read the post until here I would recommend you try it yourself.