Bits — Journal App For Mac OS X
“
Advanceddiary app with images support, tags, cloud sync and blog integration.”
Advanced → very minimalistic diary app. Currently in beta and free.
“
Advanceddiary app with images support, tags, cloud sync and blog integration.”
Advanced → very minimalistic diary app. Currently in beta and free.
You read this and start to think “I’m using my phone wrong.” Very geeky, very nerdy. I love it.

ReadKit has just been released in a new major version.
New in 2.0 of the fabulous reading app that supported Instapaper, Pocket, Pinboard, etc. now also supports reading of RSS feeds via Fever, NewsBlur and local RSS. Spiffy!
via Nasendackel
"CSS3 Buttonbuilder lets you visually design sophisticated cross-browser CSS3 imageless buttons."
I’m always a bit uncertain about these kinds of apps, but the screenshots make this appear to be a nice app. It’s $5 on the App Store.
"Sketch file from the design community"
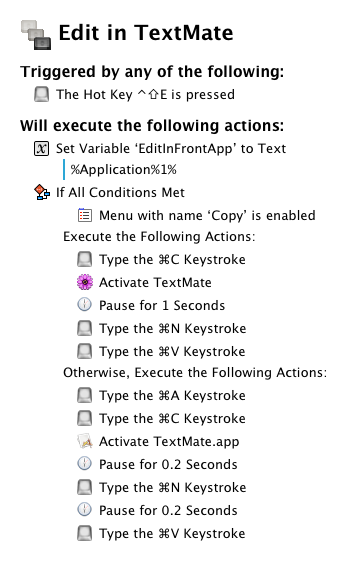
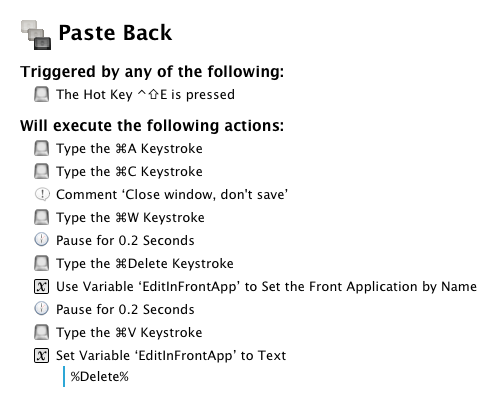
I don’t think I ever published my Edit in TextMate Keyboard Maestro macro. Oh well. Anyway. I’ve just spent 2 or 3 minutes improving my shoddy old macro bringing in some variable goodness and some of the experience I’ve gained from making my Markdown Library.1
So what does it do. Well, basically it checks now whether you have text selected or not2. The macro then does either a ⌘A followed by ⌘C, or a ⌘C only when there was a text selection already.
The macro(s) also remember the frontmost app and when you Paste Back this app is reactivated.
You may want to add these to your Global Macro Group. Shortcut is ⇧⌃E. Type ⇧⌃E → E, and ⇧⌃E → P.
A very first alpha is available. You manually have to switch to the v2 branch to check out the new stuff. Currently there’s not much new stuff. I’m using a plugin now for wrapping text, which you can use in your own macros to wrap text with arbitrary characters. ↩
This whole text selection stuff is really hard to figure out. Gabe and I got into an argument about good approaches. I would love to support other languages where the ⌘C or ⌘X isn’t the shortcut to copy/cut to check whether something was selected, but until now I haven’t been able to. Until now means, I think a KM 6 plugin could do this. I have to spend some time in Xcode though. ↩
via Lifehacker
This looks really cool. PhotoAppLink is basically a framework developers can add to their apps to make editing of one photo easier. PhotoAppLink allows to pass a photo from one photo app to the other. Some great apps like Color Splash and AutoStitch support this already, and it has probably been around for some time too, but I hope this gets some momentum.
(Or maybe (hopefully?) Apple themselves solve the “multiple photos problem” on iOS.)
Get a random avatar, in a variety of sizes. An easy shell one-liner. Will print out a list of URLs.
curl -s 'http://realbusinessmen.tumblr.com/api/read?type=photo&num=50' | ruby -r'rexml/document' -e 'puts REXML::Document.new(STDIN).elements["tumblr/posts"].to_a.shuffle.pop.map(&:text)'
I read this post by Jefferson Smith on his cloud-based Scrivener workflows. It is a recommended reading for all Scrivener fans. Though I can’t quite agree on the backup and collaboration section.
It is true that Scrivener really isn’t that good when working with a document where two editors work on one document, but if that really happens you’re not out of luck. It just gets a little more complicated.
What I’ve learned from collaboration is that I always want to create a VCS (versioning controlled system), such as Git, repository. The reason for this is really simple. I trust no one not to screw up something. Be it unintentionally or with good intention. A versioning control system keeps me sane in the times when a project becomes complicated and everybody is head over heels trying to fix something.
That said, I also would encourage everyone to use Scriveners built in backup and versioning. You can save a revision of a current document when it’s highlighted in the document list, then type ⇧⌘5. This causes a new Snapshot to be created. To view these snapshots, or to make one manually, go to the Documents menu. If this is all you need and feel like Snapshots will resolve most problems you run into, then you don’t need to read the rest of this article. For a slightly more advanced, but also more fail-safe approach, continue reading.
Now for a basic understanding of Scriveners internal workings. A document, as I’m using it here, is not the Scrivener project — the .scriv file you see in the Finder. A Scrivener project consists of many smaller documents contained in it. You find all documents in this .scriv folder under Files/Docs. They are saved in rich-text format (RTF). A file format that opens directly in TextEdit. In fact you can just do that.
I would not recommend sharing a .scirv project through cloud storage such as Dropbox for the same reasons Jefferson explains. If two editors happen to edit a document at the same time and their saving interval is slightly off by a couple of moments, Dropbox will not create a “conflicted copy”. Instead it will assume the file has been saved once on one computer and then on another — overwriting changes. It is true that Dropbox will keep both revisions, but to the user it will appear as though everything is fine. Chances are that it will not occur to anybody that there is text missing until the very last moment. Bad.
But if you keep everything organized using a versioning system, it will pick up the changes from both editors, because they were editing the same document on their end. In that case you can, in fact you have to, resolve the conflict manually. RTF is, although its entitled “rich text” really just plain text formatted weirdly. You can look at the file (in fact the differences) in a viewer such as FileMerge or Kaleidoscope. Although formatting will probably be lost during the comparing and restoring steps, you have a good chance to recover the text! Some Diff viewers are not so beautiful, but they are free and get the job done.
In one case I had both editors working on a Scrivener document, where both created new documents within the project. Both checked in and committed their changes, but only one project contained the last project state and documents of one editor. In this case a diff viewer, on the file level, will tell you what files are missing from a project. A conflict of the .scrivx project, which basically contains the structure of the Scrivener project and all related files, will indicate such a conflict. You can manually open these files with TextEdit or any other editor and manually add the missing documents to the project.
So versioning is really great. Sharing a project is bad. Having two editors working on one project is possible, but working in the changes is not that straight forward and easy.
What I found works best is to be clear on when and what someone does in a project. Communication is key. In our case we had both of us contributing to a particular project. It was clear from the beginning that we will split up the work between chapters. So the one person was mainly editing documents the other person was not working on. I found that works best for us. We use Scrivener’s Labels feature to distinguish which person edits what. We are also very strict on backup and revisioning rules. Backup early, backup often, commit and push often. The more strict everyone is about these strategies, the better it is for the project. Mistakes can happen though, we’re all just human. In those cases some manual recovery brings everything up to speed quickly through Git.
Git has some really nice interfaces for OS X. You don’t need to open the Terminal mostly.1Tower and SourceTree are two of the most recommended ones.
I would also encourage you to use all the other features Scrivener offers. Commenting, highlighting and so forth. I am always astonished by how much Scrivener has implemented to work with long texts. Such. A. Great. App.
(You can, if you’re nerdy and enjoy that kind of stuff though.) ↩
I had the pleasure of using Evernote Premium for a couple of months. Unfortunately my just ended. It’s pretty cool what it does. I would be happy with their free tier, if they would allow me to have items offline without the requirement to star them.
Evernote also falls short in terms of editing. I wanted a better solution to get the most out of my learning. Evernote is great, but it’s also limited since their system is closed and only a few apps integrate with them directly and everything needs to be synced to their servers — no offline viewing allowed. I would much rather use the entirety of iOS apps to create and annotate notes. DocAS, Notability, MindNode, the built-in Camera app even. All of which have certain niceties Penultimate and Skitch lack.
The only feasible solution? Jump ship.
First some considerations of things to give up in a non-Evernote setup has:
So you need a thing that allows you to view, edit and sync documents. Let’s go through these one at a time.
For syncing (also known as: make available) I would suggest Dropbox, Box.com or some other cloud provider. This is where you store all your documents. Create a folder for your Evernote documents, a new one for every Notebook. I called mine Study, since I was using Evernote mostly to keep questions and notes related to research I did.
You then need to be able to make your documents available offline. Dropbox itself requires you to “favorite” items for viewing them offline. So the Dropbox app is no good. GoodReader (iPhone, iPad) and Documents (previously ReaddleDocs) however, have sync built in, which also makes folders available offline. Gold.
Sync in Documents happens automatically or manually, set in the preferences. GoodReader syncs manually only.
GoodReader and Documents are also great apps to view documents such as PDF’s. They also allow to annotate PDF’s. Something Evernote doesn’t do.
These apps also view a plethora of other types of documents such as movies, audio files, text files and many more.
Editing is a bit of a pain. Just as editing photos on iOS isn’t really straight forward, so is editing documents. If you’re not careful, you can easily end up with multiple versions of one and the same document. Luckily both apps allow you to edit plain text textfiles straight in-place, but they don’t offer many features in terms of power editing. No syntax highlighting for Markdown is a huge let-down for me personally. For smaller edits though, Documents and GoodReader are doing their job.
Fortunately both apps allow other apps to edit their documents. This way you can edit a document in your favorite text editor.
I’ve been testing:
All of which work “somehow” as expected, round-tripping a document, but it’s not intuitive. If you can, use the clipboard to move the text back once you made an edit.
Writing Kit, Textastic, and Nebulous Notes also allow you to use Open In to copy the file back into Documents or GoodReader, where you need to manually replace the original file with the new version. Don’t worry though, Dropbox will recognize that you’ve been updating a file, rather than deleting and making a new one. Revisions won’t be affected.
I can’t recommend Byword for this setup. If you use Open In, the document will be saved to wherever location you’ve set Byword to sync to. Which, in my case, creates the same document again in /Dropbox/Apps/Byword.
Now that we have a place for new documents to go into, we need to get our old documents out of Evernote. This may cause some technical problems, so here’s some advice.
It is not very difficult to export these documents with Evernote 2 on OS X. Just select documents from a Notebook and select Save Attachments to Folder from the File menu. Evernote will also show a Save Attachments button in the main window when multiple notes are selected.
Getting written text out of Evernote is more problematic. Evernote saves HTML documents with its Export Note feature (also in the File menu).
Open an exported document in your favorite text editor and use pandoc to convert the document to Markdown. Get these System Services to make pandoc easier to use.
Put the HTML document in your Dropbox’s Public folder. Select the file and copy the public link to the clipboard. Now go to Fuck Yeah Markdown and paste the link. Press Go to “markdownify” your document. Select the text and create a new text document, in the Dropbox folder that is synced with Documents or GoodReader.
Obviously this will take some time if you have a large(r) amount of documents, but once completed you’re not bound to Evernote anymore.
"Transform your look the way celebrities do with this beauty industry secret that’s now available for the first time ever."
After moving I’m now trying to implement and get used to some new habits. The habit I try to modify, is hard to change though. It’s also late at night, so this needs to happen quite drastically.
Keyboard Maestro to the rescue!
Serious Break is based on Keyboard Cleaner Maestro. It functions similarly in its core, but has a mechanism added to run for a fixed period of time, rather than indefinitely like Keyboard Cleaner Maestro. Serious Break opens a TextEdit document, which you can actually edit with your keyboard, but your mouse will jump to the center of the screen if you’re trying to move it.
The macro is divided into three parts:
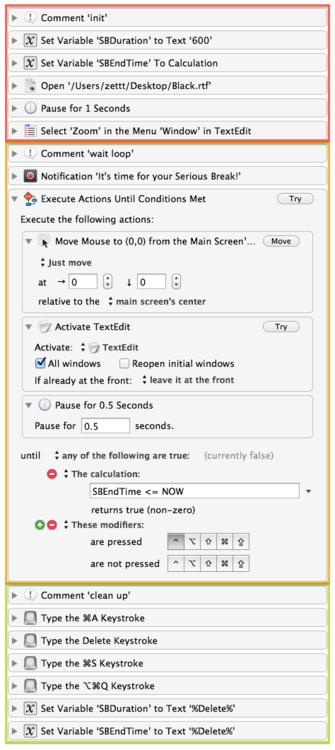
SBDuration is the time, in seconds, Serious Break should be running. SBEndTime is a calculation of NOW + SBDuration. The document gets opened and its window will be zoomed. NOW) is equal to Serious Breaks’ calculated end time. As a security measure only, you can close this loop also by holding ⌃ for a moment.The macro runs once daily for 10 minutes. In the download version I’ve set the duration to 20 seconds though. So if you accidentally invoke it, you don’t have to wait 10 minutes until you can use your computer again.
Download Serious Break and the Black TextEdit file.https://www.box.com/s/brtyd00fn47zp6a958o6
Palua, the easy way to quickly switch the mode of your Function Keys on any Mac keyboard!
You need to run a game, or start a graphic application, or work on a project that need F1-F12 as function keys, just hit option+command+TAB and the switch will happen.
Speaking of great updates, TextExpander touch 2 is out as well! I’m also really excited for this one, too, because TextExpander touch adds the feature I was waiting for since it came to TextExpander: Fill-Ins.
Right now none, or mostly none, of my apps support the new TextExpander touch SDK yet, but one of my favorite apps, Drafts (iPhone, iPad), supports it already.
TextExpander touch is $4.99.
Keyboard Maestro 6 is out today! I’m really excited about this. I’ve been playing with it over its beta phase. It’s really cool. Unfortunately in the middle of the beta phase I had to look for a new apartment and move. So other things were more important than the latest and greatest in apps. (Just as an apology why things seemed to have slowed down here.)
Keyboard Maestro 6 comes with a new and neat icon picket that allows you to customize the look of macros.
For me the addition of a debugger is the best new feature in Keyboard Maestro though. Developing bigger macros, like my Markdown library, can become tedious. With this debugger it’s much easier to find bugs in macros.
Since I’m still a bit out of the loop, I’d recommend reading Gabe’s writeup.
Upgrade is $25, a new license is $36. It’s a no-brainer.
Neat web app for your Gists.
Via gridwriter
Chrome Extension to manage YouTube — in the spirit of TweetDeck (my most favorite Twitter client).
via Lifehacker
"FinderMinder allows you to specify where (position) and what size you want newly opened Finder windows to appear. The default Finder behavior is to remember the last position and size for every window, but this can be frustrating if you already know where you want every window to appear (for example, centered at 800x600). FinderMinder must be running for window reposition and resize to take place."
This Lifehack Lesson will help you get your digital organization system in shape and cleanup all the mess that you’ve accumulated on your PC and online.
Lifehack.org now has “lessons”, some of them are free, like this one. Other lessons are relatively cheap at $2 each or $5/month subscription. Registration is also free.
This free lesson on digital organization is rather short. I can’t tell if other lessons will have more content. That said, I like that these lessons have tasks for me/you to do. This way you have smaller step goals towards a goal.
I just stumbled across this app. Its name is Geofency, an app that measures how much time you have spent at a certain place. With Geofency you can essentially monitor how long you’ve been at work, compared to how long you’ve been at home. Pretty neat.
VisualAck is like grep (or ack), except faster and with UI. For Mac.
I use Tumblr’s bookmarklet for pretty much every post on my Mac. On my iPad/iPhone too, unfortunately. Tumblr’s own iOS app has URL schemes built in since 3.0. You can see these in action with [Launch Center Pro](http://actions.appcubby.com/search?s=tumblr) or [Drafts](http://actions.getdrafts.com/draft_actions/78). Especially Drafts 3, I thought, is perfect for blogging on iOS. With the linked URL Action above, it becomes really easy to create a new post on iOS. Sometimes though, why not go the direct route when it’s just a quick post? Thanks to Don ([@binaryghost](https://mobile.twitter.com/binaryghost)) who wrote [this rather extensive post on MacStories](http://www.macstories.net/reviews/ios-automation-and-workflows-with-drafts/), I was able to whip up a basic bookmarklet for Tumblr iOS. javascript:window.location=’tumblr://x-callback-url/link?title=’+encodeURIComponent(document.title+’\n’)+’&url=’+encodeURIComponent(location.href)+’&description=’encodeURIComponent(window.getSelection())
Create as usual and you will have a quick way to share links on Tumblr. Boom.[^bugintumblrapp] [^bugintumblrapp]: If you want to do me a favor, there’s currently a bug in the Tumblr app. Posts created via URL scheme can’t be deleted. Once you are in the app, press delete and you are stuck there. S please report it to Tumblr so we all get it fixed.A great tip for those who want to play Flash Video aka FLV’s on their Mac or those who just generally miss Perian. The tip comes from the comment section of a German blog I found by accident, looking for an alternative to the fabulous Mediathek app (an app that used to be able to download German TV shows from governmental broadcasters like ARD, ZDF, WDR).
The commenter mentions that most YouTube and other videos might already use a codec that is able to play on a Mac, but because the video is encapsulated in a format QuickTime (or better your QuickTime codecs) won’t play, they won’t play in iTunes or QuickTime.
ffmpeg can copy contents from a video track to another video track without reencode. The command goes as follows:
ffmpeg -y -i input\ file.flv -vcodec copy -acodec copy output\ name.mp4
Try this with Walk Off The Earth’s Somebody That I Used To Know. The command runs in mere seconds on my Mac and does indeed produce a compatible video that plays in QuickTime X.
Here’s the German article in case you’re curious.
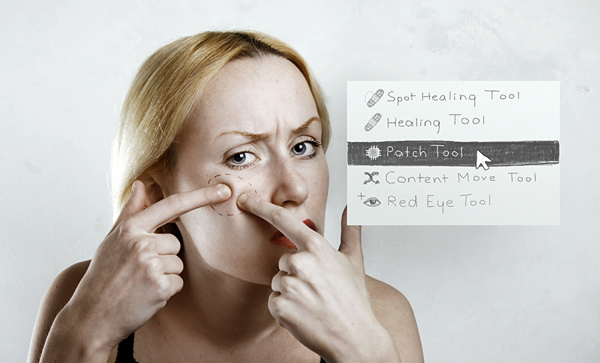
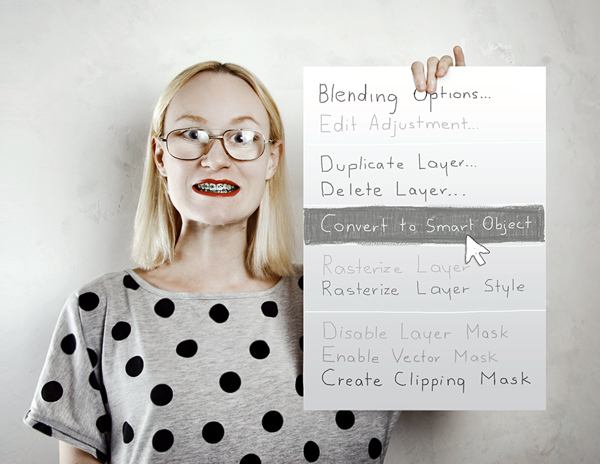
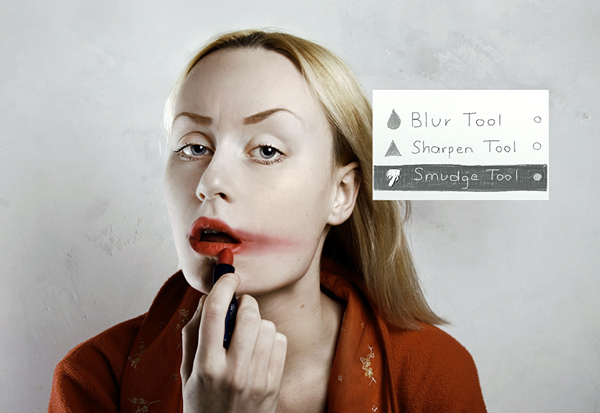

What Photoshop Would Look Like in Real Life?
Flora Borsi | http://behance.net/yayuniversal
My name is Flóra Borsi. I’m 19 years old and I live in Hungary. I’ve interested in photo-manipulating since 2004. I’ve been taking photos since 2007. I won a half-professional camera on a photo contest in 2008 and I’ve been working with that since then.
I usually do (self) portraits, concept arts, photo-manipulations, fashion editorials. The essence of my photos is to visualize the physically impossible in a form of photo manipulation. At portraits I’m trying to mediate the models. I haven’t mentioned my style, because I think it hasn’t been emerged, and it’s still developing and forming
Via thedsgnblog
Great online outliner that uses OPML.
via I Miss My Mac

In Working Out At Home I recommended body weight exercises as a good free alternative to costly training in the gym. By that time, I was still looking for a good app for iOS for BWE. A couple of weeks ago I visited Cannstatter Gesundheitstag (Cannstatt health day) where a friend recommend You Are Your Own Gym (YAGOG).
The app is really great! I’ve been working out with it a couple of times now and the exercises explained got my blood pumping. The only “downside” for me was that I needed to jump to the hard exercises immediately. The “hardest” exercises are really hard. I tried one or two but failed. If you are new to exercising you will appreciate that you can pick from predefined workouts or pick easy, semi-easy, medium, etc. individual exercises. For instance, did you know that if you can’t make full push-ups yet you can progress from a very easy “lean against the wall”-push-up to more complicated ones?
Exercises are grouped into five categories Push, Pull, Legs, Core and Whole Body. This makes it very easy to find the right exercise. I wish the exercises were sorted/grouped within a group though. That would make it easier to differentiate pec exercises from delt exercises.
YAGOG comes with video instructions for each exercise. There are so many of them to keep you busy for a long time! Each exercise also has a More Detail view where you find instructions and information which muscles are affected. I like how “equipment” says “your body” most of the time.
The app is only $2.99. A steal if you ask me.
"If your boss hires a UX instructor to rant about colors, fonts, and Comic Sans, drink"
Why Ruby is awesome.
Feed Wrangler is a modern, sustainable RSS reader.
Featuring a web interface, apps for iOS, tight integration with Instapaper or Pocket and ‘Smart Streams’—a clever feature which lets you group selected feeds into a river of news, create feeds based on search criteria, or mute feed items based on keyword filters.
An OS X application is ‘coming soon’, and an API for third party developers is set to launch this month.
A subscription to Feed Wrangler will set you back $18.99 a year; the various apps are free.
$12 DIY Camera Track Slider (by CrazyRussianHacker)