9 Command Line Tricks for Mac OS X You Should Know
Includes purge but is otherwise a nice overview.
Includes purge but is otherwise a nice overview.
"An easier way to browse ThemeForest."
Template for iOS icon design. Includes icon several lists (Spotlight).
This post is dedicated to a good friend and his problems when watching movies. Here’s the story. He’s watching movies on a Mac, but the audio is output to his stereo. A common setup. The problem is that at “dialog level” the movie sounds fine, but in action-packed sequences the audio is just way too loud.
A while ago he was asking me for a solution. He was annoyed to reach for the volume control like some monkey. Wasn’t this computer supposed to make things easier? I couldn’t think of a good solution, but now that I watched all episodes of #TNG1 again, I can.
So here’s the solution I’ve come up with. It’s far less pretty than you might think.
I’ve tested this with Logic and Apple’s free AU Lab. I’m going to provide my AU Lab session with settings at the end.
Here’s my attempt at explaining why this is going wrong.
When you’re an audio engineer mixing a movie soundtrack. There are several “tracks” that need to be incorporated in a movie. The main ones are dialog, audio effects, and music.
To emphasize gripping scenes, loudness is used. The more “gripping” a scene is, the louder it usually is too. This is known as dynamic.
The problem is that our home “theaters” are not cinema theaters. We have less space, less people and less power. Therefore the mixed audio doesn’t translate well to the smaller home theaters. There’s a too high dynamic range coming from the movie. It’s like having a concert in the kitchen.
To adapt to the changes, the movie would have to be mixed again to fit in the smaller home space. As your own movie collection might suggest, this doesn’t happen often (or at all). Studios don’t have the budget for this kind of customization. (It would have to be done for every language too)
The solution to this problem is some sort of live re-processing of the movie’s audio, shrinking the possible dynamic range.
The audio routing is relatively simply. A movie player plays the movie, the audio signal gets transmitted over some kind of audio bus, an audio processor grabs that signal and outputs to some other bus (possibly the same, but a different channel), then a transmitter needs to grab the processed signal off that bus and transfer it to the receiving end.
Soundflower would be a one-stop solution, but neither Plex nor Airfoil allow audio track selection for Soundflower. Airfoil always takes from channel 1 and 2, and Plex always outputs to channel 1 and 2. It’s not possible to tell Airfoil to use channel 3 and 4 instead. That limitation in mind, it’s not possible to use 1-2 as the audio processor’s input, and 3-4 as its output.
Airfoil can “hijack” any app’s audio output though. Therefore the app processing the audio needs to be hijacked in order for the signal to be sent to an AirPlay compatible receiver.
Signal Flow diagram:
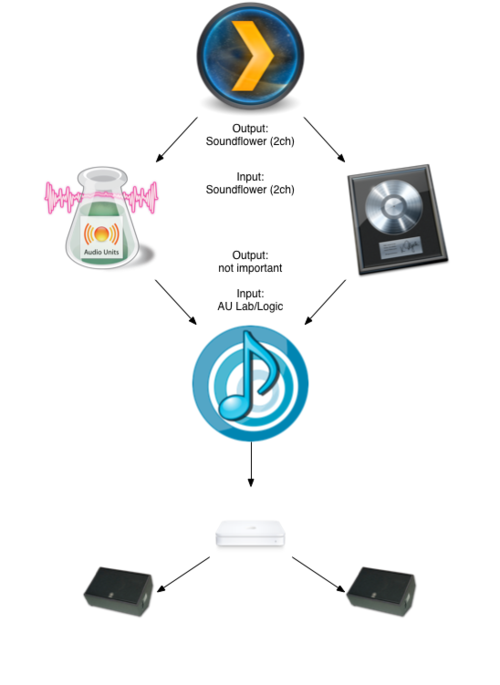
Plex has its output set to Soundflower (2ch). Logic/AU Lab have one channel’s input set to the same device. Logic/AU Lab process the audio with some limiter and compressor. The output of either app is hijacked by Airfoil, which transmits the signal to an AirPlay receiver.
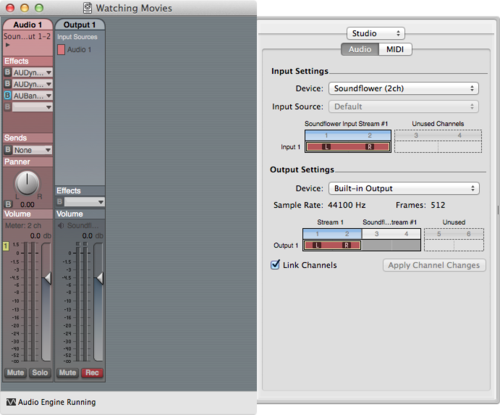
Set audio output to Soundflower (2ch). (Preferences → System → Audio)
In Logic go to preferences and set Audio → Audio Input to Soundflower (2ch) and output to Built-In Audio.
In AU Lab create a new document and use Soundflower 2ch as input and Built-In Audio as output. Change later in Window → Studio.
Finally, hijack AU Lab’s audio output. (Select AU Lab in the upper input selection) and submit to an Airplay receiver. This way, everything AU Lab outputs will be in Airfoil.
If Airfoil doesn’t seem to be able to catch the audio. Disable everything, quit AU Lab and then restart AU Lab by activating sending from Airfoil. This will launch AU Lab from Airfoil, hijacking all audio output.
AU Lab is a free tool that can even save and load documents including AU settings.
The audio processing is relatively straight forward. We need to catch the very loud parts and make them not exceed a certain level. A limiter does the job:
Apple AUDynamicProcessor
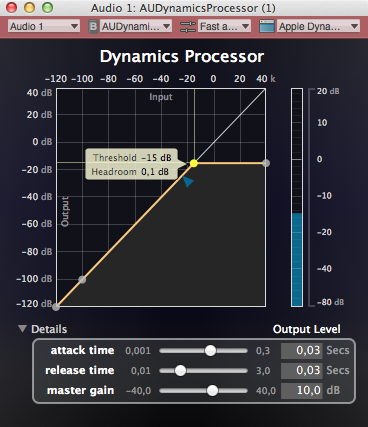
This way the movie will never get past a certain volume. Note that I set a +10 dB make up gain.
Another loudness processor (compressor) is being used to smoothen the audio further.
Apple AUDynamicProcessor
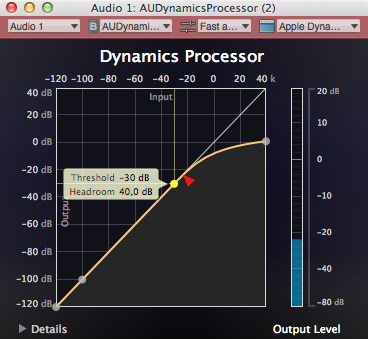
With this compressor, the overall loudness differences become smaller. Loud parts become quieter, quiet parts become louder, thus making everything sound more dense.
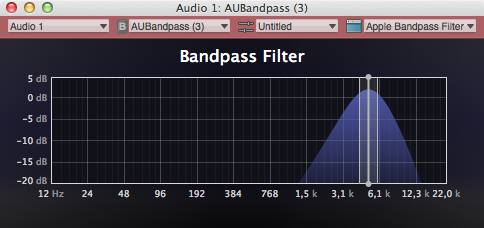
To check whether you really hear the processed audio or the original audio, add a very obvious effect like a narrow bandpass filter. (Disable by clicking the small Bypass button in the channel strip)
Some notes here too:
I’ve been using FindTheProblems to monitor my server’s reachability, but since it was only built for Prowl I wanted something different.1 Something that works with Pushover so that I can uninstall Prowl. Lets face it, Prowl was nice when it came out but has been superseded by apps like Pushover.
StatusCake is a free (and paid!) status monitor that not only monitors your website status, but also supports Boxcar, Pushover, and Noti. Check it out.
I know that I’ve could have built it myself, but I never had the time and energy. ↩
The Hobbit - production video, behind the scenes.
Also check out the other production video while you’re at it. ENTV


Until now no one has shown their interest for the iTunes 11 Live Tutorial. I assume everybody is busy with Christmas stuff or has some other obligation. That’s fine. I’ll cancel this tutorial then, because it doesn’t make sense to make a new date for this. There will be too many iTunes 11 tutorials when more time passes.
Anyway.
There will be a Mind Mapping Live Session after Christmas though! (January)

After I had Icons and Coffe’s Perspective Icons in place, I was looking at some of the icons I had in the toolbar and thought a script I use could also need a refreshment.
Populate Template Placeholders, if you didn’t know, is a script that let’s you have “project templates” in OmniFocus. It uses « and » as delimiters for variable content. It’s pretty clever.
The old icon looked a bit outdated next to Silvia’s.
You can download my icons from this repository. Click on Raw to get the raw picture. I hope the rest is self explanatory.
I sent Curt a pull request as well.
Enjoy.
Nostalgia: Apple Final Cut Pro 1.0 Overview 1999
"App Camp for Girls wants to address the gender imbalance among software developers by giving girls the chance to learn how to build apps, to be inspired by women instructors, and to get exposure to software development as a career."
Fantastic project by Jean MacDonald from Smile Software.
Silvia Gatta has designed a special icon set meant to be used for your OmniFocus Perspectives. They replace the standard icons as well as give you a slew of options for your custom perspectives. They look gorgeous!
As everybody on the web (at least the small slice of the web that I read) have already written about this. I wouldn’t, again, not write about this if I hadn’t1 something to add to the mix of posts.
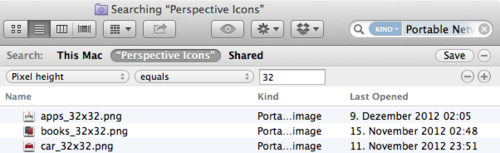
I found it hard to navigate the icons as every set of icons is located in a respective folder2. One in standard resolution and one in retina resolution. To make navigation easier create a Smart Folder with the following options:
Enjoy.
Viticci links to a modified bookmark let to easily copy a pages URL wrapped in () for using in Markdown. Great for writing on an iOS device! Thanks.
Love this piece of history. It’s where I found MindNode. In that time I was subscribed to this German developer forum to be informed on all the new great apps coming out, before they’re actually coming out. You know, for screencasts and such. I saw MindNode and it’s pretty much anything that I used ever since. I think I’ve bought almost everything else, but stuck with MindNode for various reasons. It was always the cleanest and easiest to grasp app of all of them.
When I give a presentation it’s usually a mind map. When I plan out new projects they start in a mind map. When I take notes it’s usually a mind map. When I attend a meeting, mind map.
PS: I will give a free live webinar on mind mapping in January!

iTunes 11 is out and it’s confusing a lot of people. I want to do a live webinar on the software and explain the changes.
Attendance is open (and free!), but I suggest a donation of 5 Euros, via the PayPal button.
PS: I’m sorry this is 2pm on a Wednesday for Americans, but I hope you realize that it’s night where I live.

When I wrote Inside my Hyperactive Brain, I got some comments from people with similar problems. It seemed to have struck a chord with them.
In the post, I forgot to explain how iOS helps getting something done. That’s what this post is for.
iOS is perfect for focused work. Single-tasking is my favorite iOS feature. It can’t do more than one thing, so I can’t do more than one thing.
As I wrote previously, reading is a big challenge. I want words to come in quicker, but that also means I need to take regular reading breaks, otherwise I’m not able to process all the information. There’s an app called QuickReader (also available as Lite version). It’s a Speed Reading app. A technique that, with some practice, allows one to read faster while keeping comprehension.
Instapaper has a share menu which allows to get an article directly into QuickReader. QuickReader puts visual guides on the screen for reading. The speed is customizable.
iOS is also the place where I start many articles. This one has been written entirely on an iPad. Writing on an iPad is awesome. One big screen that you can use to type stuff into. As Tim Cook says he writes most of his emails there and so do I. A lot of stuff I write has originated on the iPad. It’s become an indispensable tool when working with clients too. I have a questionnaire I go through with new clients to figure out what kind of screencast they want. I also have MindNode here. Most screencasts actually start on my iPad or iPhone.
Because not everything can be rainbows and unicorns, there are some downsides on iOS too. First of all Notifications are as poisonous to concentration as they are on the Mac. So I keep them off most of the time. Fortunately iOS 6 introduced Do Not Disturb. I like to think I’ve configured it atypically, since I have notifications off during the day. DND is on (notifications are off) between 11am and 5:30pm. My core business hours are from 10am to 6pm. You see that I allow notifications a slight overlap for notifications to get through while in the office. This makes for a nice transition from and to “work mode”.
When I’m at work, the iPad is where I consume media and where I communicate with the outer world. From 12am to 6pm, I don’t use my Mac’s email and reader app for media consumption. It’s a rule that I have set for myself. If you want to do this kind of stuff too, it helps to remind yourself why you’re doing it: to remain focused and concentrated. You might even setup something more advanced with Keyboard Maestro where "when this app is launched and if time is between x and y then quit app". This way the app won’t even launch. Again you’re doing this for your health, not to force some arbitrary rule on you.
I wish I could write more, but iOS is a clear device. No, or few, distractions. I’m using this thing mainly to communicate during the day and I consume media after. I’m glad I have it.
photo credit: University of Maryland Press Releases via photopin cc
Supports “syntax highlighting for many scripting and programming languages”.
Love it already.
via @macdrifter
I wanted to assemble a list of my favorite TextExpander snippets. From my 1114 snippets there are the most important ones.
Note: This is very technical, geeky, if you’re not up for this stuff, this is not your article.
This posts elaborates on a lot of TextExpander tricks and tips. I’ll explain three right here so you don’t miss them.
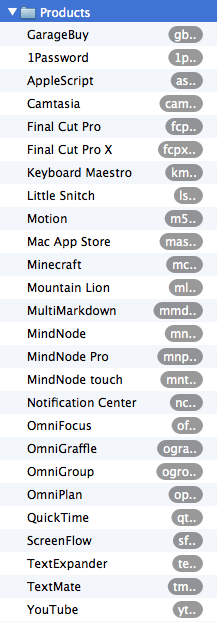
%clipboard as part of a fill-in popup.I’m using these a lot. Basically whenever I write a mail or tweet these are my friend. Every product that I use regularly goes in here. 1Password, MindNode, Final Cut Pro, Motion, etc. I use a double .. to expand most of my snippets. It’s just a pattern I stuck with. I don’t like adding double letters to the beginning. I find to too hard to memorize.
When the thing that differentiates your snippets from normal words, is at the end, you have the advantage that you can decide if you want an expansion after you started typing already.
With double-letters you need to decide upfront whether you want to expand a word. With an expansion designator at the end, you don’t.
I’m pretty sure you’re going to find other useful TextExpander blogging tips in (*drumroll*) other blogs, so I’ll keep this one short and only give some suggestions other bloggers haven’t written about yet.
in14days%@+14D%B %d, %Y
If you make a lot of raffles, this one is really useful. Say you’re raffle ends in 14 days. You write the post and where you insert the end date you just type this abbreviation and TextExpander fills in the correct day for you (with correct weekdays!).
Suggestion: “embed” this snippet in another snippet. Your “conditions” section for example, and it will always have the right date.
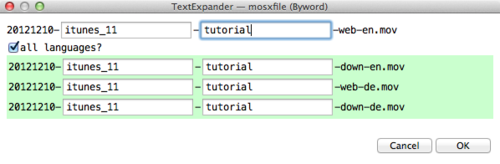
mosxfile contains:
%Y%m%d-%fill:name%-%fill:type%-web-en.mov
%fillpart:name=all languages?:default=yes%%Y%m%d-%fill:name%-%fill:type%-down-en.mov
%Y%m%d-%fill:name%-%fill:type%-web-de.mov
%Y%m%d-%fill:name%-%fill:type%-down-de.mov%fillpartend%
and expands to:
This one looks complicated, but is actually kind of simple. At Mac OS X Screencasts every video exists four times. Two for every language and another two in download and website quality which makes them four. I use a special file naming pattern for each. As you can see I’m using the same variable multiple times. This makes whatever I type into one field, appear in the other fields too. (Use this if you write lots of <tag>%|</tag> code)
When I give a hat tip here to a user from Twitter I generally link to either their main profile or the tweet the hat tip originated from. The snippet tuser gives two fields to type in. Same trick:

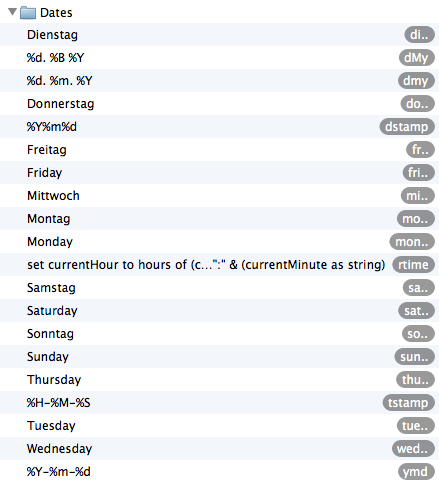
With TextExpander there’s no excuse to ever use abbreviations, because everything can be automated. I wanted to have the choice, however, and prefer to add .. here too. Since I’m writing so many emails in German and English I have both languages weekday’s as snippets.
fstamp and dstamp are the ones I use for file- and date stamps. Every new screencast version gets its production date assigned.
rtime is a script I wrote for a time-sheet which rounds the time to the next/previous 15 minutes. This way it’s easy to track the time I’ve been working on something.
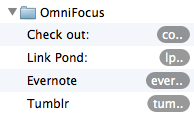
I read a lot of articles on my iPad. When they are read, I decide what I want to do with them. I delete, archive, or link to them. Depending on the situation I use these snippets. Link Pond is a continuing series of link posts from my business blog.
I got basically every piece of information that people regularly need from me in this list. My home street, post code, city, all email addresses, my tax id, my iCloud ID so that I can easily SSH back to my Mac. Stuff that is sort of private, but public enough to keep in TextExpander’s “plain” text format.[2]
short@domain.com, e.g. c@mos becomes contact@macosxscreencasts.com.wwdom, e.g. wwmosc for www.macosxscreencasts.com and wwmosd for www.macosxscreencasts.de. I have two more snippets for http:// (htp) and https:// (hts)mmosx for Mac OS X Screencasts and zzca for zCasting 3000.My email signature is a post of its own.
Not very technical. I have a snippet to insert the Shebang at the beginning of shell scripts and one I use for advanced Google searches. I took this idea from someone else but couldn’t find the reference anymore. I’m sorry.
%fillpopup:name=popup 1:default=site:link:related%:%|%fillpopup:name=where?:www.macosxscreencasts.com:www.macosxscreencasts.de:default=mosx.tumblr.com:% %filltext:name=Search term:width=40%
He or she had a snippet that basically inserts site: in front of some text so that they could search one site specifically. I rewrote this snippet to get some more “advanced” options. I’ll explain this a bit more. When expanded the menu looks like this (faked screenshot!):
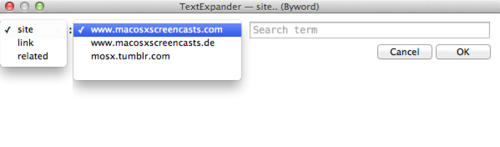
Normally I want to search a specific site, so site is the default for the first parameter. Followed by that are the websites I generally search for, in particular my own. mosx.tumblr.com is default here. Followed by that is a text field for the query. You see that there is an empty option in the address field. The reason for that is that I can look up any other page that is not among my favorites with this too. The search term field is slightly wider so that I can type more easily.
I just type site.., the menu comes up, I leave it at site: and tab ⇥ twice. Now in the search term field I enter my query and hit ↩. Once expanded I now see the cursor right after the colon and can paste a URL from my clipboard (if necessary) and confirm the search using yet another ↩.
The Tumblr URL is third and default because this way it’s less work to choose the “blank” address.
Note: right now it is not possible to put the clipboard or some other variable content in a menu or the expansion. (If you could that would be great.)
A collection of most keyboard shortcut symbols I need to type often each day (when I use shortcuts in a screencast for a lower third, etc.). The convention here is not to safe characters, but to make it easier to insert these characters. Whenever you see a ⌥ or ⌘ here on this blog, it was probably typed using *opt and *cmd.
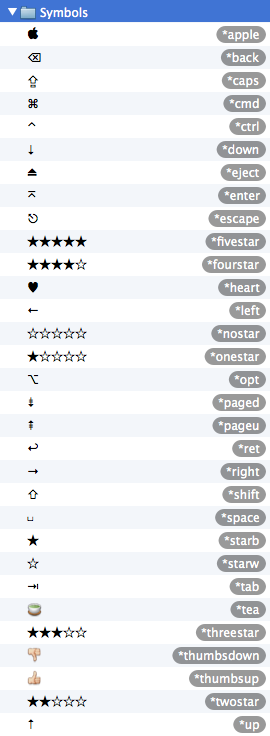
*tea because tea is more awesome than coffee. Always. 🍵
Lorem Ipsums for 1, 2, or 3 paragraphs. I haven’t got a quite as a sophisticated setup as Brett, but those three snippets are all I need. You’ve seen them in action a couple of times watching my screencasts, probably.
Obvious. I made the German ones[3]. So why shouldn’t I have them set to auto-update once a day?
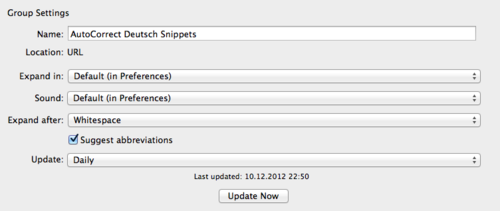
The English AutoCorrect is useful too.
This is stuff I haven’t created, but you can check out.
Yes, all on GitHub. Found using the GitHub search from above.
Yeah, you got me, I’m planning a iTunes 11 tutorial for next week. ↩
The exception being my iCloud ID. ↩
The German ones that is, the English ones were created by Smile’s Jean MacDonald. ↩
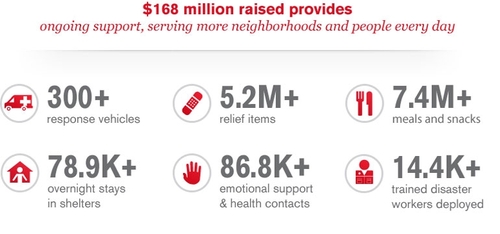
Second donation made. The donation was made earlier, but I wanted to reflect on this and let you know how the Red Cross is actually helping. Now that the hurricane isn’t #1 in the news anymore.
The second payment was €90, but I rounded that number up, including the first payment, to €333.3. That means my second donation was actually $135.
My payment wasn’t quite as high as Apple’s, but I was glad to give for a good cause. The Red Cross has raised $168 million in total.
I wanted this paragraph to be a glorious elaboration on the good things the Red Cross is doing, but found that many people feel like the Red Cross hasn’t met their expectations. I feel sorry for those who feel mistreated. I am aware that the Red Cross may not have handled the situation as well as they could have in some instances, but i feel the money was good invested.
In the end, I think, all that matters was to give when others needed help. No matter whether there were better alternatives. I don’t regret my decision, nor making the payment.
I’m quite happy how this turned out. The Red Cross has helped many people. MacStories Viticci and Chris Herbert were a big help. I highly recommend you subscribe to MacStories. Great articles from awesome people. I’m looking forward to work with them in the future.
For now though, I have to hide myself in the studios to finish some screencasts. I also got an announcement to make regarding a new mind mapping webinar.
Thanks to everyone who bought the tutorial. I never expected so many good reviews!
I just installed a new theme here. The old one wasn’t good enough anymore. This one’s very clean (and it was free too). I hope you like it.
The thing that annoyed me most was that heading 2’s and 3’s always looked the same and I never had enough time to tinker with the CSS.
via @mangochatney
If you’re an active participant in the Sketch beta this little Hazel rule might be for you.
When using the (beta) app it pops up a “new version available” dialog at the start of every workday. Of course this is getting cumbersome after 20 or so days. You have to go to their website, download, rename to “Sketch Beta”1 and move to Applications.
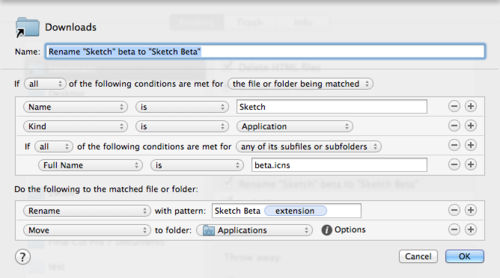
The trick is easy. The beta app contains a file named “beta.icns”. If this is present, then the app should be moved and renamed.
This way you can have both versions, beta and stable release, installed. ↩
TNT’s “Dramatic Suprise on a Quiet Square” was a really good one.
I’ve discovered Little Buddha just recently, but the blog is quite nice. I don’t like lists though, so I redacted the number.
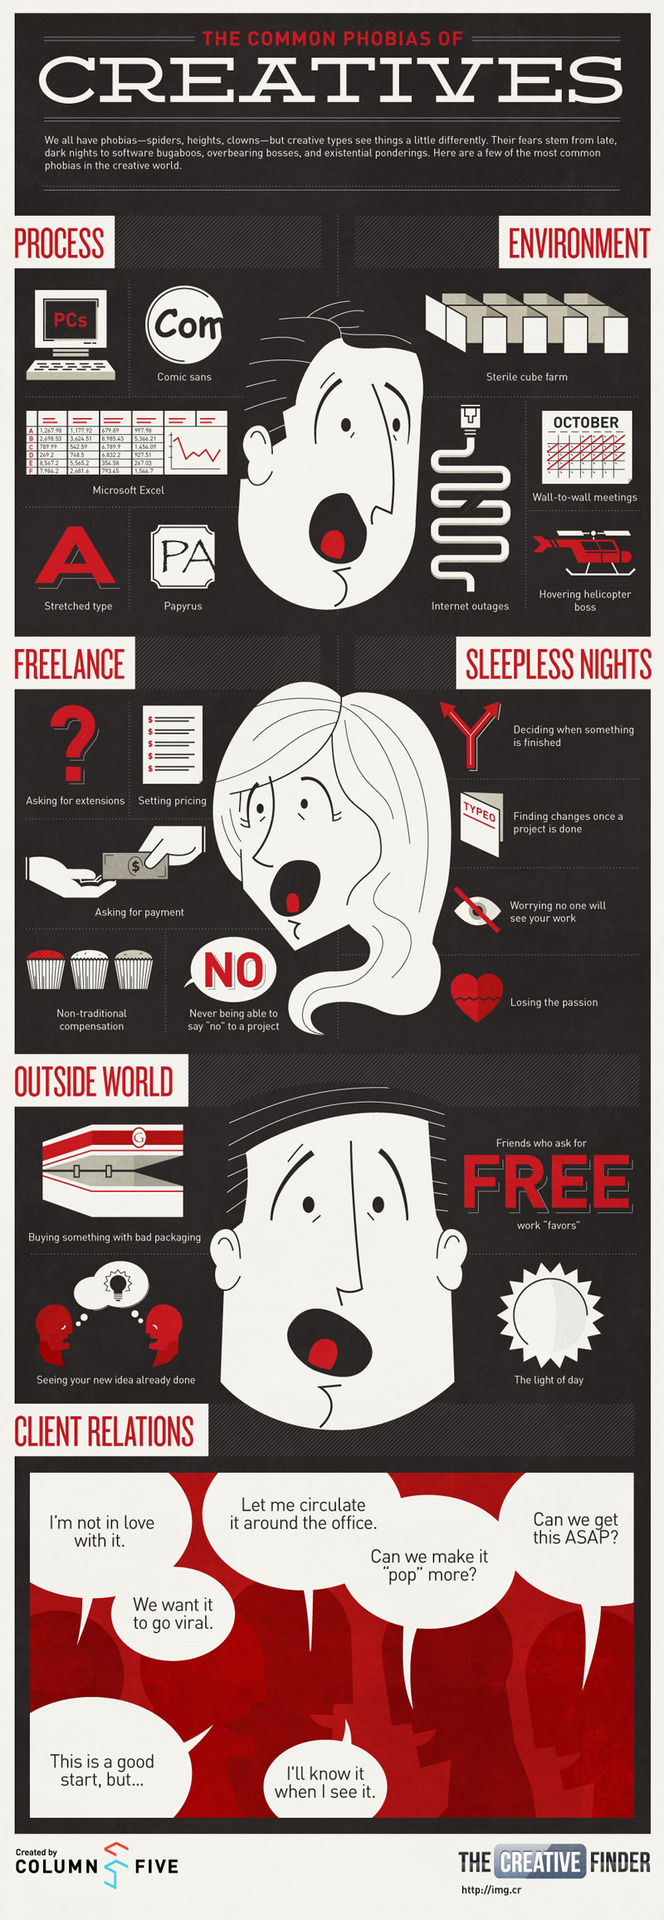
Freelancer’s biggest fears. I love it.
Via Column Five Media.
If you missed this in my earlier post, I really recommend reading this. If-then planning “can double or triple your chances for success.”
I’m not against skeuomorphic design entirely. I think it’s useful for many reasons, it’s stupid for various other reason. As with most things, it’s important to keep the balance and make the right decisions. Christopher Downer (Realmac Software) has a very good write-up on this topic.
A very thorough explanation on how to fix battery problems on an iPhone. I think I read first of this at Macdrifter, but I’m not sure anymore. It’s been a while. I never had this kind of issues, but I found it useful to hear that crash reports can be viewed directly on an iDevice.
Again a “how to have less (annoying) stuff in your life”-article. Recently I had the feeling I had too many apps on my phone. Frankly I don’t have many compared to the 200+ of some colleagues, but I still like to keep my phone clean(er-ish). Sometimes I just can’t get rid of an app for whatever reason. The following method works for more stuff than just “apps”. I found it to be equally good for subscribed news feeds, OmniFocus projects, Mac/iPhone/iPad apps, even “things to keep on my desk” , too.
The technique is done relatively easy. You get your spouse sitting next to you. Now go you through all your apps/subscriptions/whathaveyou individually. Your task is to describe each one and why you want to keep it. “This is the thing I’m using to ….” Your friend listens and tells you which ones to keep.
By describing each item and “defending” them, it becomes much easier to identify those that are a burden. Sometimes you can just delete an item right away without explanation.
You: “This is the app I bought so that it becomes easier to write blog articles on my iPad.”
You’re spouse: “What happened? I didn’t see you writing more often.”
You: “I guess i didn’t keep that promise. Guess I don’t need it then.”
This is really easy to do in 15 to 30 minutes.
With this trick I was able to identify those things that I once thought were interesting, but actually never cared about. I’m down from 130 to 102 apps again on my phone and from 183 to 126 subscriptions in Google Reader. Very little energy, high impact.
photo credit: Phillie Casablanca via photopin cc
A follower has adjusted my Send To Pushover for Alfred. I like it!
If you are like me, you sometime have a lot to read on your Instapaper/Pocket account. “Just reading” all of them is not that easy sometimes. There are those articles that you always promise yourself “to read one day, just not today”. Those articles accumulate and start to get annoying.
First off all, good news: you’re a normal human being. You function normally. The reason you have stuff to read shows that you are actually interested in increasing you’re knowledge by reading, which is a good thing.
Here’s a technique I’ve come up with in the gym, that’s the place where I usually read my articles or books.
I know it sounds radical, but you have to see it like this. The next time you open up your reading app there are fewer articles. This tip is not about reading less stuff, it is about how you get quicker to the stuff you are interested in, so that you can spend more time with those things that are more important to you.
These two writings are related, but appeared in my subscriptions when I was done writing this. Pure coincidence.
photo credit: taiyofj via photopin cc
I wrote this article in the gym, too. ↩
Nice tip by Jonathan Poritsky.
The Finer Points of David Rees (by MotherboardTV)
David sharpens pencils for a living. Charges $15 per pencil. He made sharpening pencils his living.
I think for people how like to draw by hand his work has some high value. He’s also obsessed with the quality of the pencil itself it seems, which is good for those kind of people.
Send him your pencil in the mail and you get a really sharp pencil.