Unicode to HTML Converter [Link]
"A handy utility to convert a Unicode character into the HTML code. I have no idea why the OS X character viewer doesn’t do this."
via @Macdrifter
"A handy utility to convert a Unicode character into the HTML code. I have no idea why the OS X character viewer doesn’t do this."
via @Macdrifter
For various reasons I wanted to print my iTunes receipts as PDF. Automated, of course, since I needed all of them fom 2011 until now.
Of course Keyboard Maestro was a big help here. I stumbled over Nerd Gap’s post and based my macro off of his.
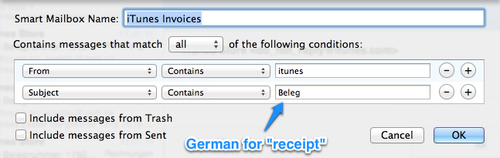
First we need a smart mailbox that displays all iTunes receipts.
Select one of the mails and add a create a new smart mailbox. Give it some details to find all of the receipts. In my case all emails happen to have a similar subject and sender name.
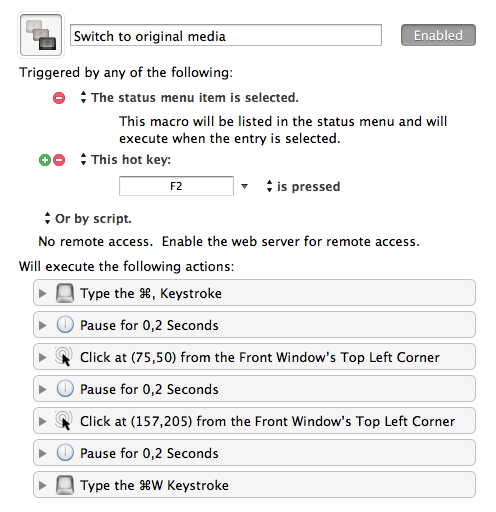
Building the macro is a bit more trick because I have the option “display remote images in HTML” off in Mail.app. That’s why I’m using a click action to click the “Load Images” button before initiating the print process.
All the window animations take some time to complete, so I’m using Pause quite extensively. The macro saves the PDF’s directly on the Desktop (⌘D, ⌘S).
A double-⌘P prints as PDF. (Set in Application Shortcuts under Keyboard). You can also add an alias to your Desktop under ~/Library/PDF Services — which can have its own shortcut.
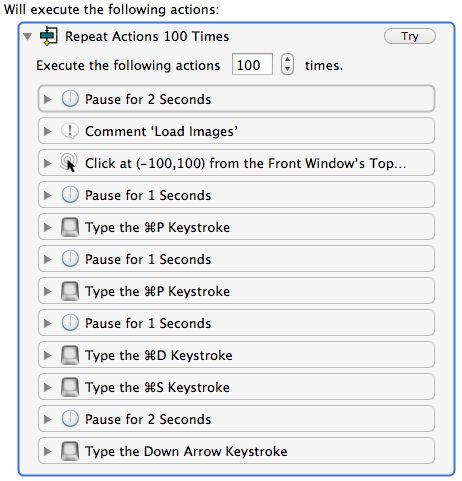
You can further automate the process by wrapping the entire macro in a Repeat action. Just make sure the list with the receipts is highlighted (the message has a blue background), otherwise “down arrow” will cause problems. I’d recommend trying this with a repeat of 2 or 3 first!
Then activate the macro and get a cup of your favorite tea.
On the plus side, with a macro like this, you can save every email (that is also supposed to be a receipt) as PDF, so that you can mail it to your accountant.
This is an extension that lets you assign hotkeys to arbitrary actions, which are just javascript code snippets (Coffeescript coming soon). The extension provides an API (small but evolving) which includes functions for tab management, opening bookmarks, launching bookmarklets, page scrolling etc., and also jQuery is available along with the whole DOM of the page.
Don (@dirtdon) describes how the AppleScript can be used to call Cocoa methods. Thanks.
How encryption works
"Retinizer is a small app I wrote that allows apps that aren’t retina ready and are displayed pixelated at 1x to display their UI widgets at 2x. That way, only their custom images will look bad and not the whole app."
via aptgetupdate.de
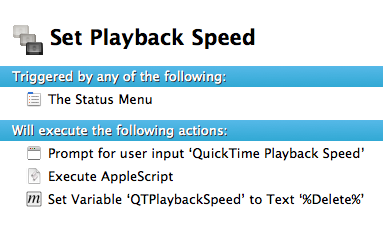
If you’re watching “some keynote” or listen to a podcast and want quicker playback, iTunes actually can’t do that, but QuickTime can. Unfortunately not directly in the app, but with a little bit of help of AppleScript it can.
I wrote a little Keyboard Maestro macro to dynamically set the playback speed. The macro asks for the playback speed multiplier when its run.
https://www.box.com/s/s4b3y0qq6smfctu5c8pf
EDIT:
I found this method to be only half-baked, because when you press ⌴, the video plays at its normal speed. So I made two more macros. One captures ⌴ and triggers the AppleScript that tells QuickTime to play at the altered speed, and one that cleans up the variable used in the AppleScript when QuickTime quits.
(The link has been updated.)
EDIT 2:
Some bugs to resuming playback, in case the Keyboard Maestro variable the macros use is not existing or set, have been fixed in the last version.
EDIT 3:
A commenter wrote that a ⌥-click on the forward/backward arrows speeds up the video in 0,1 increments. Thanks!
Nice collection of Window management macros from the Keyboard Maestro Wiki.
Great podcast by the way.
I’ve attended Stuttgart’s 5th Barcamp this weekend. Part of the event is always an introduction, where the attendees say their name and three of their main interests. The intention here is to make it easier to find interesting people and as icebreaker.
Unfortunately, as the event kept becoming more crowded every year, it was also increasingly harder to actually see the people as they introduced themselves.
Luckily we’re all just a bunch of nerds, so we came up with the idea of having a moving camera.
I’m sharing this knowledge in English so that some other Barcamp may use it for their event. I think that’s in the spirit of a Barcamp.1
Instructions are for iOS and OS X.
Sending the video is easy as pie. Just follow the instructions of either app. This usually means you have to install some driver.
Then get a desktop app that displays the video. Unfortunately all Apple apps won’t work with non-Apple certified equipment. So PhotoBooth, QuickTime Player and iMovie are out. Almost all third-party apps support these QuickTime Extensions though. Skype does and so does BoinxTV — which I used. Admittedly BoinxTV is a rather expensive investment for an otherwise so openly organized event like Barcamp. It’s not a requirement though. Other free apps like Macam support third-party cams as well.2 All you need is basically an app that reads these third-party QuickTime Extensions.
UPDATE: I played about with CamTwist recently and found that it can do pretty much anything BoinxTV does, but is absolutely free and not as straightforward to use. There are a lot of good tutorials online.
BoinxTV, apart from being a great live event video app, is able to add “layers” on top of the camera video. There’s a layer to display a Twitter search for instance. Everything can be activated and deactivated with assignable keyboard shortcuts.
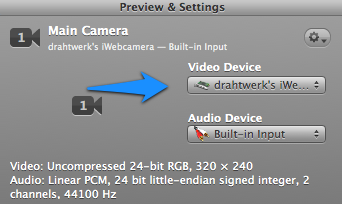
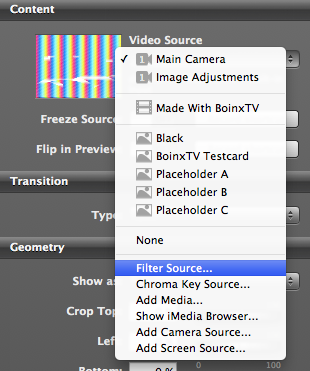
You may want to adjust the picture’s brightness a bit. You can do that under Content on the left.
For best results, the streaming and receiving device, should be both on the same, separate, network. If you have no network to spare, create an ad-hoc network.
When the iPhone is connected it won’t show a network availability icon in the upper bar where the clock is! The app will work though.
Now launch the app. It should connect shortly thereafter. A menubar icon (on your Mac) will appear when a connection has been established and, most importantly, your iPhone’s camera will be on the projector’s wall.
The only downside of using the Mac’s ad-hoc network is reduced WIFI reach. We had good results with 20m from the camera to the phone though.
Make sure the Mac stands elevated above the attendees’ heads! This makes it easier for the computer to receive the signal.
Although the phone got shaken quite a bit, it dropped the connection only once. Sadly, no one actually dropped the phone.3
Happy conferencing.
"App IDs are "the herpes of iPhone provisioning". Once you’ve created one, you’re stuck with it for life. You can’t edit it or delete it. By the time I realised this, I had way more than I needed."
A Safari Extension to help solve common App ID problems. By @s1mn
lol1
Don’t forget to click on Docracry: “Open Legal Documents”.
I feel lucky not to have had clients like this (yet). ↩
In this test some real official signs of different designers and places have been compared for their recognition. Interesting to see which symbols are in real use. I have no clue what some of them try to communicate.
There’s nothing I’d like to add to this, except: RealStudio? Still strong and going, huh?
This post is in German. I’m just offering readers to download the mind mapping presentation I gave recently.
Für alle die die Präsentation live verpasst haben, können diese auch im Nachhinein noch herunter laden.
Dieser Vortrag war Teil der Coworking Week 2012.
Die Auflösung ist leider etwas schlecht, daher hier noch der Download der originalen MindNode Datei. Konvertiert, damit sie auch mit der kostenlosen MindNode Version funktioniert. Und einem PDF, damit auch wirklich jeder die Präsentation nach verfolgen kann.
Really cool workflow on how to upload images to an FTP with Hazel.
This is rather old. I kept it in OmniFocus to write about it, but just now had time to do so.
The only thing, I think, that could make this easier would be rsync (3.0) and SSH with a passwordless login to the server. For example:
rsync -az -X --safe-links --exclude=.DS_Store /local/dir -e ssh ftpserver:~/pictures/
Although this would cause the entire directory to be synced whenever a file is changed!
I read this article a couple of times now. I’m still not sure what to take away.
Is it bad to frame the OS X icon? Does it make a bad icon? If I look on my iPhone and don’t have a Mac, does it even occur to me?
I haven’t made a final decision on this questions yet, but I wanted to share the article. What’s the take away for you?
via @Macdrifter
I came across this editor recently. It’s open source and multi-platform. It probably hasn’t all the functions Audacity has, but it looks way nicer and is much easier to use. This is the 2.0 beta. I recommend giving it a try.
This is a really interesting lifehacking article I came across long time ago. It describes how “personal heating” can reduce the electric consumption of an household.
I’m not sure how practical this is though. I mean, wouldn’t it make more sense to heat one room this way the other room the other? Or heat different rooms differently depending on time and purpose. The living room/home office with personal heating during the day, and warm and cosy on the evening.
"From creating icons to providing user support, iPhone Blueprints covers the start to finish of user interface design. The chapters are rich with examples, and resources for that demonstrate overarching principles for creating rich and effective interfaces."
Beautiful (free) book.
I learned Final Cut Pro X and Motion 5 since it’s been released mid 2011. It seemed a really promising app.1 I think I learned the tools well. Maybe you’ll recall my post from last year where I said "Final Cut Pro X is not a pro-sumer application. Now that I worked with it, I can tell you it’s not. It’s actually one of the best video editing apps I’ve ever used. Watch this presentation to get enlightened why this generation of editing software is just another transition.
A couple of changes in my work environment now make it necessary to move forward, and I don’t see any other way than to take the leap and start using FCPX in my production environment.
Three months ago I started the production for my Hazel tutorial. After the recording was finished, I had to decide whether to stay with Final Cut 7 or use Final Cut Pro X.
It was no easy decision. I knew the day would come, but it came quicker than I anticipated.
This is not going to be a post about how I think Final Cut Pro X is a professional tool and whom it’s for. This is going to be a written down version of the things I’ve learned along the way. Things that are really great, things that make my life easier and things that make it harder. Maybe other screencasters will profit from my experience.
I hope you’re in the mood to read 2,500 words about the new Final Cut.2
Before I begin with the main part of this article, I like to explain how I use the tools to get my work done. Mainly in regard to FCPX and Motion. Though I use other tools as well.3
I work on recordings of computer screens. Mainly recordings from iOS and OS X devices. We do a first rough edit in ScreenFlow. The final editing is done in Final Cut. I spend most of my time in Motion though. Motion is a 2D (and 3D) animation application. It’s no less “mighty” as After Effects, the industry leader. Motion has less bloat and, as we will see, the integration with Final Cut Pro X is just damn awesome.
Motion is so important because it allows me to manipulate the recorded screens. I have all the images from the operating system (buttons, sliders, menus, etc.) saved as graphics. When a client wants me to change something in a screencast, I can just do that in Motion without re-recording (and editing) everything again from the beginning. I can manipulate whatever we have at the moment. Motion is also the tool that allows me to make an app “look good”. If the flow the user has to go through while using an app, is longer or more complicated, then we can’t show that in an ad. The app has to shine. So I just go ahead and make it look natural.
Think of it like “retouching for apps”. I can basically rebuild an app without any code. Everything is possible. Programmers might choose, say, a view transition, that is easy to do with CoreAnimation. I don’t know what’s easy to do in code, so I don’t have that creative border. If it feels right to have certain UI elements fly around and rearrange to accommodate for changes in the app, then I can change that easily.
Eventually though, I always end up in Final Cut, it’s where I put all the pieces together. Did you know that the MindNode “brainstorming” screencast has five layers? That’s a lot of layers for a screencast. A usual Mac OS X Screencasts screencast has about one, maybe two. There’s the main recording, the titlebar with WIFI symbol and clock is another one4, the touch animations are another layer, then a text layer, and finally one layer for edits to “correct” mistakes made in the recording.
TL;DR: I spend most of my day in Final Cut and Motion. Here’s what I learned.
Let’s start with the best feature of Final Cut Pro X and Motion 5: Rigging and Publishing. With this Apple allows to build Titles and Effects in Motion that are then available in Final Cut, but without all the cruft Motion’s interface comes with. Think of it as “making a plugin for Final Cut.”
One only publishes the color of a rectangle and its color picker will be available in Final Cut. Every new instance of that template (or rectangle) can have a different color.
Rigging is more complicated to explain, but I’ll try. With it checkboxes, popup menus, sliders, on-screen handles can be published that allow to manipulate multiple values at once. Examples of what can be built with this:
Rigging and Publishing are the two best features in Motion 5. As screencaster this is pure gold. A motion graphics dream. It is absolutely phenomenal to publish a template so that my editor can just pick it up.
A great tool is Motion Template Tool by Andreas Kiel. (Read more in the [tools][] section.) With MTT I can save Templates with a version number.5
To give a brief overview of what Rigging can do, watch this video by Fox Mahoney and checkout Callouts by Ripple Training.
It took me a while to understand how everything, but I’m at a point where I can use it effectively. (And it’s so much fun!)
All the plugins that now get built for Final Cut…I can hardly keep up testing them.
Remember the “magnetic timeline” that was supposed to make things easy? It does make things easy!
It’s not easy to work with at first though. All those clips that “automagically” move around. It’s weird. I had a feeling of losing control. When I got used to it though, it became natural. I learned how Final Cut does its things and the automatic moving is most of the times just great.
Editing transitions is just so much easier now with the Magnetic Timeline:
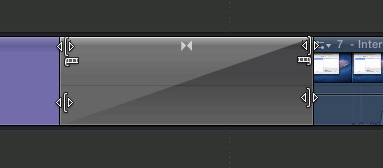
The two handles on the top right and left allow to move the out and in-point of the clips.
Keyboard shortcuts makes this easy to work with. Just place the playhead on either side and nudge with , or . for a frame-precise edit or ⌥, and ⌥. for 10 frames precision.
The other two handles determine the length of the transition. This alone is so much faster compared to the “old way of doing things”.
One can move pretty quickly through a project using JKL, or the ↑ and ↓ buttons (which move the playhead one edit forward or backward). Once the playhead is on an edit, [ and ] can be used to select the in or out point of the adjacent two clips.
Nudging works as described in the previous paragraph. Again there’s nothing to worry about. Everything just moves as needed. Just make sure every clip is connected to the correct clip in the Main Storyline.
Hold down ⌥⌘ while clicking on the clip in the Main Storyline and the connected clip changes its connecting handle.
Sometimes it’s necessary to work “non-magnetically”. What I mean by that is that one sometimes need to edit a clip, but keep the clips in the Main Storyline where they are. In those cases where clips can’t move around automatically, “Lift from Main Storyline” ⌥⌘↑ comes into play.
This shortcut “lifts” whatever is selected (either via an in-point/out-point selection (i and o as shortcuts) or an entire clip (c selects the clip underneath the playhead by the way) in the Main Storyline and moves it up onto a separate layer. All clips (and connected clips) stay where they are because this function inserts a so called “gap clip” in its place.6
Once the edit is made, simply overwrite the Main Storyline by pressing the opposite keyboard shortcut ⌥⌘↓. Beware: If you’ve changed the clip length, the underlying clips will be affected by this! Longer clips will get shortened by the lifted clips and a shorter clip will leave parts of the gap clip in the Main Storyline.
The “Final Cut Pro 7”-way of creating a freeze frame is also gone. The current frame can be exported from the Share menu and imported back in, though that should only be used it when the “Final Cut Pro X”-way doesn’t work.
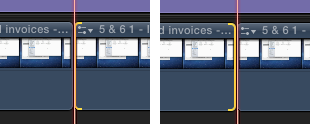
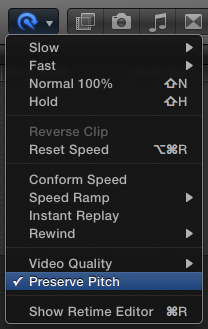
The FCPX-way is ⇧h. This inserts a 2-second long, 0% speed part of the clip — a freeze frame — that can be lengthened and shortened using the left and right handles in the Retime Editor (⌘r).
Unfortunately the rest of the clip now also has “speed” applied to it, which means the clip sounds “manipulated” on playback. In those cases select the clips that play at 100% and deselect “Preserve Pitch” from the Retime menu.
Though this solves the problem in most cases, I found that sometimes the audio slows down like a turntable that loses its power. An easy way to work around this is by creating a second clip that has its speed changed to 0%.
Cut/blade (⌘b) the clip in the Main Storyline, lift, adjust the length either via Retima Editor or by selecting the clip and hitting ⌃d (which shows the clips’ duration in the dashboard in the center), then drag the clip back into the Main Storyline. All other clips will rearrange as needed.
As there can’t only be praises for Final Cut Pro X, there have to be some complaints as well.
As with Final Cut Pro 7, Final Cut Pro X can embed Motion files in a project. This has the advantage that the project size is far smaller than if I’d have to add a high-resolution render (ProRes 4444 or Apple Animation if transparency is used) of the Motion project as layer in Final Cut.7
Because it is so preferable to have these Motion projects directly in the project, there is the problem that one needs to archive these with the project when the project is done. This causes a lot of trouble since in Final Cut Pro X. Thew new Final Cut searches the installed templates when a project is opened. If there’s no matching template, it can’t be used within a project. In Final Cut 7 Motion files were saved independently.
To backup and archive a project [Motion Template Tool][] can be used. I solved archiving by having a separate disk image that has basically three folders.
I produce a lot of video for the web. On the web, space is precious. I have to produce videos in frame sizes that are far off what you expect from a DVD or the cinema. The videos are much smaller, or they need to scale to various sizes. Therefore being able to set the frame size is a necessity. Without it I can literally not do my work. I mean that in the literal literal way.
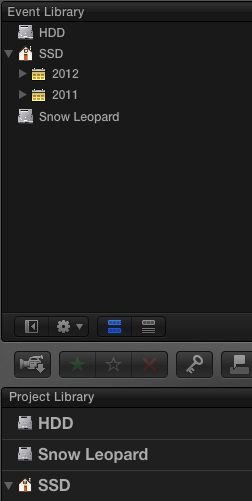
Final Cut Pro X can’t do that. There’s no way. Apple has not provided a way to set an arbitrary frame size for a project. There is however, a way to turn any Compound Clip into a “mini project” that works and acts like a project, but doesn’t live in the Project Library. Compound Clips live in the Event Library.

This app allows to build installers and archives of custom Motion template files. It is developed by Andreas Kiel. Although this app is essential, it is important for me to keep as few dependencies as possible. MTT satisfies my requisition. The files it creates are only text files. They contain information where the templates were installed. Perfect. If MTT ever dies, I’d have to open the .mtt with TextEdit and install everything manually. More hassle, but I could do it without it. I can also just create these installers by myself, albeit less convenient.
Motion Template Tool also has the ability to add version numbers to templates. Designs aren’t made of stone. They change constantly. Therefore versioning these files actually makes a lot of sense to me. Since I work with developers, using a VCS seems like a natural pick. It’s surprising that only a few motion designers actually do this.
Ripple Training does not just produce some of the best Final Cut Pro X tutorials. They also recently started creating their own plugin, Callouts. The good thing is they work together with Noise Industries, so the plugin comes as option in FxFactory.
FxFactory are officially endorsed by Apple to distribute “plugins”. Most plugins are Motion templates now. That’s how powerful this integration is.
This one’s obvious. It translates Final Cut Pro 7 projects into Final Cut Pro X XML for import. Only basic edits are kept though, because it’s not possible for 7toX to translate more complicated transition effects into the new format. If you want to go the other way round, then there’s Xto7 – coincidentally by the same company.
I’m actually not trying to up-convert old projects. Some time ago I’ve decided to keep an older computer for this purpose. A backup machine if my machine suddenly dies and to keep older software running. I’ll probably also use some virtualization software to have an older OS installation somewhere.
Markers is another third-party app that solves a convenience problem. Final Cut Pro X can’t export marker lists anymore, so that one can make movies with chapters easily. An exported FCPXML however, contains the marker information. I could go through the XML and read all the timecodes manually or I could use Markers. Again, if this thing dies, nothing is broken, it’s just less convenient.
It’s been an interesting year. I kept moving back and forth between the two editors. When I opened Motion 5 for the first time, I fell in love with it. I occassionally set time aside on a weekend to learn the new tools. I became more and more comfortable with them. Now that I took the plunge, I can’t unlearn what I learned from actually using it in a production.
Despite the screwed up launch. ↩
By the time of writing: Final Cut Pro X 10.0.5 and Motion 5.0.4. ↩
Were you really hoping to find a list of apps? OK, here it goes (only video/design related apps listed!): Sketch, Acorn, mCopyRemover, ScreenFlow, Camtasia, Template Folder Maker, Gimp, Inkscape, Sip, ColorSchemer Studio, OmniGraffle, Invisor, MediaInfo, ImageOptim. ↩
Yes, it’s fake, sorry to break it to you. ↩
In Git. ↩
If you temporarily want to work without the Magnetic Timeline select the Position Tool from the Tools Menu (shortcut: p). ↩
A Motion project is only a few megabytes big, whereas a render of 10 seconds material is already about 200 MB depending on the frame size. ↩
I’ve been meaning to build something like this for a while, but didn’t have enough time. This package of Keyboard Maestro macros do a couple of things that will make creating other OmniFocus or other macros much easier.
This is a great tip! Hat tip to @telonaes who has helped me collecting the download material for my Hazel tutorial1.
You can use the linked instructions to purge all sorts of app backups. I recommend searching the library for folder that contain the word “back” or “backup”. That way you’re hopefully going to pick up apps you didn’t know do backups in the first place.
Which I just finished. ↩
Don’t forget to check out the other Automator stuff by Automated Workflows. I also highly recommend watching the Mac Automation Made Simple Podcast. A video series about AppleScript.
Cool iPad app for teachers. It’s free, too. By way of Fraser Speirs and Bradley Chambers Out of School Ep. 4 Podcast
Since there are no keyboard shortcuts to switch between Proxy and High Quality media easily, I wrote two Keyboard Maestro macros to do just that. I set the shortcut to F1 and F2 for now. Enjoy.
This is the official repository for the now open source ZFS filesystem. Is anyone using this?
I’m going to give a presentation about mind mapping for creative people. How to use mind maps in creative jobs and to get things done.
"Do you also have that feeling to constantly have thousands new things on your mind while working and need to sort those? Then mind mapping may be the right thing for you. You don’t believe me? Come see for yourself!"
The presentation is going to be 1 hour long and in German. It’s part of the German Coworking Week 2012. Here are the details:
We gladly welcome everyone to this open for everyone session!
UPDATE:
I’m trying to stream my presentation. Just visit: http://www.ustream.tv/channel/coworking0711
No guarantee this is going to work though.
"By using this little script, I can set all of the windows of the apps that I want to record to the correct size. Then when I record the screencast, I can crop the viewable area down to 1280×720 and all of my apps will take up the full screen, providing pixel-perfect clarity on any device that can display 720p (like an iPad for example)."
Except that every window on OS X has rounded corner and whatever is underneath will look through the cropped video. Why not just set the monitor to 720p if it’s the desired screencast resolution?
"I put together a file to ease designing app icons and wallpapers for general mockups. It features both a homescreen and lockscreen."
A Glassboard board where some geeks share their productivity tips & tricks. Highly recommended!
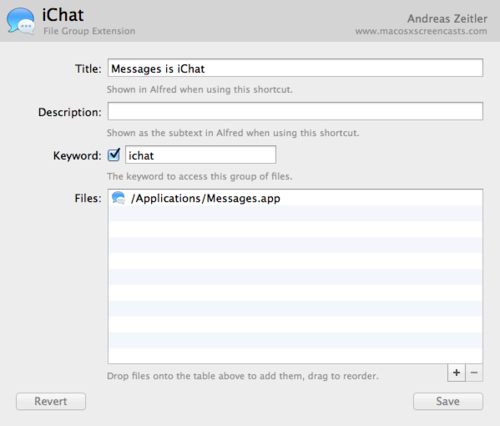
I’m having a hard time to get used to the new name of iChat “Messages”. I mistype it more frequently because I don’t use the app that often. (Compared to Calendar and Contacts)
Therefore a little Alfred Extension can help here:
/Applications/Messages.appYou can drag Messages onto the icon well, then this Extension will even have Messages’/iChat’s icon showing.
Such a neat idea, unfortunately totally useless with Alfred since you can just add a new search filter for the mentioned Caches folder (see the linked forum post) and add the type OmniFocus Project to it. Otherwise a really cool idea.
I’m getting more into using Color Labels for my work. Since I think labeling should be possible from anywhere I searched for a way to add Labels from the command line and Alfred as well.
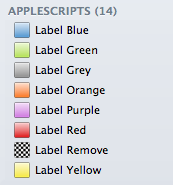
Alfred is quite an easy task. A couple new extensions, plus some icons that can be called from the Actions do the job quite well.
I made one extension for every color and one to remove the label. The extensions can “toggle” (label/unlabel) the color as well.
on alfred_script(q)

    set q to (POSIX file q) as alias

    tell application "Finder"

        if label index of q = 0 then
            set label index of q to 4
        else
            set label index of q to 0
        end if

end tell


end alfred_script
Download: https://www.box.com/s/av7vj4ob6joeufr4a0y3
The command line option is a bit trickier, because OS X doesn’t have a CLI utility to set color labels directly. A neat script added to your .profile should do the trick though. I made some changes, since I don’t like typing label 4 file.txt to label an item. label yellow file.txt seems more naturaly, isn’t it?
Note that you can remove a color label by typing “remove”, “none” or “blank”, e.g. label none file.txt or label remove file.txt.
# Set Finder label color
label(){
  if [ $# -lt 2 ]; then
    echo "USAGE: label [0-7] file1 [file2] ..."
    echo "Sets the Finder label (color) for files"
    echo "Default colors:"
    echo " 0  No color"
    echo " 1  Orange"
    echo " 2  Red"
    echo " 3  Yellow"
    echo " 4  Blue"
    echo " 5  Purple"
    echo " 6  Green"
    echo " 7  Gray"
  else
    osascript - "$@" << EOF
    on run argv
        set labelIndex to (item 1 of argv as number)
        repeat with i from 2 to (count of argv)
          tell application "Finder"
              set theFile to POSIX file (item i of argv) as alias
              set label index of theFile to labelIndex
          end tell
        end repeat
    end run
  EOF
  fi
}
Matrik looks like an interesting new app for audio enthusiasts and podcasters. It can route audio from anywhere to anywhere.
The standard version has 8 Input’s and Output’s and the Extended version has 24 I/O’s.
For OS X.
I recently helped a friend backing up her iPhone 3G. I put the files on my Desktop temporarily before they were transferred back to her phone.
CrashPlan saw the files and, of course, backed them up to CrashPlan Central.
I think she didn’t get why I constantly asked her whether it’s OK to save her Address Book on my computer…That’s another story though.
I wanted to get her files off my backup. The solution is called “compacting” and is done in a couple of ways.
I’m posting this because the official instructions by CrashPlan is not very “extensive” let’s say.
This Wiki however has some more information posted, which is especially useful when there are items that you’ve deleted already and now want to delete from your backups as well.
Now that more and more software doesn’t access “System” folders it gets harder to, e.g., find duplicate files there. Recently I found Decloner (the official one from the website) doesn’t scan / anymore and Gemini never could scan that folder.
I think now comes a time where “computer nerds” need to reside to other tools – sadly.
fdupes is a command line utility that is able to scan a folder for duplicates.
Example usage:
dupes --recurse --sameline --size .
Very elaborate overview how to setup and use launchd.